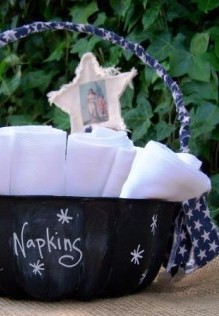
How and How Long:
- Sand the pan if necessary and then wipe it clean.
- Mark off drill holes for the basket handle on opposite sides of the pan.
- Drill hole and sand the rough edges.
- Coat the pan inside and out with Krylon Indoor/Outdoor Primer. Use as stated in directions.
- Let dry/cure completely.
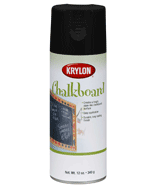
- Break out the Krylon Chalkboard Paint and begin coating the pan (In the end, I gave the outside and inside about 4 light coats each).
- Let dry/cure.
- Prime the surface by rubbing chalk all over and wiping off (You can do this at anytime, but it is easy to do now).
- Cut a 24″ length of coated wire for the handle (I made this long so it would be easy to work with the first time. As you get used to it, you can probably cut it shorter).
- Thread about 4″ through one hole; bend it up and around toward the top; wrap the short end around the loop about 2 times. Use wire cutters to cut excess.
- Determine size of the handle and take the long end of the wire up and over, and then through the hole on the other side; thread the end through the hole; come up and wrap the end around the loop 2 times; cut off excess with wire cutter.
- Wrap the wire handle. I used strips of fabric. Leave 6″ tail and thread fabric through the hole; tie off at the connection point (when you looped the wire and cut excess); bring the tail toward the top; wrap fabric (long tail) around the loop and back through the hole and up the other side of the loop; continue wrapping up the handle. When you run out of fabric, wrap it tightly and begin another strip of fabric by overlapping the end point.
Approximate project time: 1 hour.
|