How and How Long:
- For the 1'x12's pieces of plywood:
cut two at 36' sides.
If you want the doors inlaid like mine, cut two at 10 1/2'. (If you are using a different width-take 3/4' off to allow for width-shelves.
- Cut three at width (11 1/4') top, bottom and freezer bottom. 12' freezer door
20 3/4″ fridge door.
- Cut from the 1'x2' pieces of plywood:
11 1/4' bottom ‘kick plate’
Scrap piece of plywood-cut to width and height of fridge (or you could get another 1×12 and just have leftovers).
- Sand all edges until they are smooth.
- Next using the wood glue and some nails, we assembled the fridge.
First the top was attached to the sides, directly under the top we put one of the shorter shelf pieces, to stop the freezer door from going inside.
Then from the bottom of the top piece to the top of the shelf that separates the fridge and the freezer is 12″
The middle shelf was the other short shelf and it was just put in where we thought it looked right.
The bottom piece was placed 1 1/2″ from the bottom, this is not a necessary step, you could just put that piece on the bottom-cut the door an 1″ and 1/2 longer and forget the next step, but I think it looked nicer this way. We then put the small piece of 1×2 under the bottom piece.
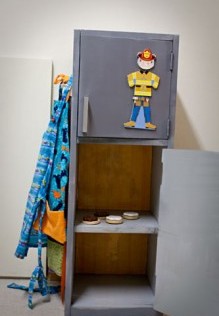
- Take it it outside and give it a couple coats with the Pewter gray.
- I took the doors and sprayed them with magnet paint. And then did it again, and again…I put so many coats on those doors I lost count! The thicker the coat, the stronger it will be. I still can’t stick the Leapfrog size magnets because they are too heavy, but anything light weight sticks well-like the Melissa & Doug dress up doll clothes and those plastic alphabet magnets.
- Attach the back to the fridge, mark the plywood where the shelves are to make it more stable. Just use small finishing nails to attach.
- I decopauged some yellow paper in the back of the fridge and freezer so it would look like the light was on when it was opened, but that is optional.
- Attach the drawer pulls that you chose for the handles and you're all done!
Approximate project time: 3 hours.
|