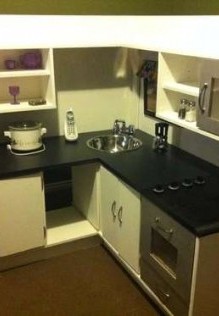
How and How Long:
- To start I took a desk I already had and measured it all. I wrote down all of the measurements so I could make a pattern. If you start with an entertainment center, you could put the sink and stove where the TV is supposed to be and the cabinets would already be built in.
For my pattern, I put the bottom shelf 4 inches above the ground. I did a piece of wood from the ground to the bottom of the shelf 2 inches in.
I took apart the whole desk and cut 6 inches off of each leg so the desktop was 23 1/2 inches high.
- Priming and Painting: I cut all of the wood using a table saw my mom's neighbor had.
The wood I did have to get I got at the local hardware store from the scraps section. I got 5/8" thick MDF. Often I find big sections of MDF in the scraps section for a few dollars or even 50 cents per board. You could use spray paint to paint everything one uniform color like I did.
After cutting the wood for the cabinets I primed and painted all of the wood - both the wood I had cut and the wood from the desk. I already had spray paint, so that part didn't cost me anything. I did 2 coats using a white tinged primer and white flat paint.
- Assembling the kitchen: I assembled the kitchen once it was primed and painted using screws and corner braces.
I started with it upside down and once the cabinets were built under the desk I turned it right side up to attach the hutch.
- The Sink: To do the sink I cut out a hole in the desk using a jigsaw in the shape of the bowl. I put the bowl down inside and glued into place using wood glue.
To do the faucet I drilled out holes using our cordless drill to install an old sink my parents gave me.
- Stove: For the stove, I started by taping off the area I wanted to be painted above the oven. I painted the stovetop with black paint.
I took old CDs and super glued them 3 high for each burner. I used the CD spindle to help stack each CD exactly on top of the next one.
I bought oven knob replacements at my local hardware store. The oven knobs came with a bunch of different adapters. I chose the adapter with the smallest center hole to use for this project. I then used a nail that had a head big enough it wouldn't go straight through the center hole on the adapter. I made sure the nail was long enough to go into the desktop, but not too long to go straight through it.
I then put the nail through the adapter and nailed it into the desktop on the marks I had made. Once the adapters were nailed in I pushed the knobs on, fitting them to the adapters.
I glued on the painted burners using wood glue.
- Microwave: To do the microwave, I used the cabinet that was already in the desk. I took off the cabinet and cut a 7.25" by 7.25" square.
I took another piece of 1/8" MDF the same size as the cabinet door for the microwave. I cut a 7" by 7" square in the same place and glued both pieces together with wood glue. I spray painted the door an aluminum color and painted the inside white.
I then cut a 7.25" by 7.25" square of plexiglass and glued it to the inside of the microwave door using a hot glue gun.
I added cabinet hardware for the door handle. I used Modge Podge to secure the print out to the wood. First I painted a layer of Modge Podge over the whole door. It looks creamy but will dry clear. I placed the number pad in the position I wanted and let dry. Once dried, I applied another two layers of modge podge over the top of the keypad.
I also installed a magnetic closure so it "clicks" when opened and closed.
- Oven: For the oven I used the same tactic I used for the Microwave. I spray painted the front an aluminum color and painted the back white.
I cut a 6.25" by 8.25" rectangle out of plexiglass and glued it in just like I had the microwave using a glue gun.
I then added cabinet hardware.
I added old racks I got from my local thrift store for the oven rack inside.
I also spray painted the drawer under the oven the same aluminum color.
I have the door swinging out not down because I was afraid if I did it down kids would step on it and break it.
I also installed a magnetic closure so it "clicks" when opened and closed.
- Dishwasher: The dishwasher is my favorite part.
To do the dishwasher I sprayed the front an aluminum color using spray paint. I added "pull" style cabinet hardware for this one. I have the hinges at the bottom so the dishwasher actually opens like a real one. The door rests on the floor so if kids do stand on it then it shouldn't be too hard on the hinges.
I used the cabinet hardware I had from the desk (from the drawer that I turned into an oven) for the top rack. I just screwed the drawer slides into the plastic and it worked great! I put washers and nuts over the exposed screws on the inside of the basket to prevent it coming undone or scratching a child. I also bought a utensil holder that actually came from a real dishwasher from my local thrift store for just $1. I actually bought the baskets at the same thrift store for $1 each as well.
I also installed a magnetic closure so it "clicks" when opened and closed. My little girl loves this and laughs and claps every time she opens it.
- Window: To make the window I used an old picture frame and spray painted it black. I took a picture of the view from my actual kitchen window and had it printed to put in the frame.
I sewed curtains by taking a scrap of fabric twice as wide as the picture frame and about 4 1/2 inches long. I surged all of the edges and sewed under 1/4" to the sides and bottom of the fabric piece. I sewed under 1 1/4" to the top of the fabric piece.
I threaded 3/4" thick elastic through the top of the fabrc piece, using a safety pin on one end of the elastic to wiggly my way through the material. I nailed each end of the elastic to the back of the picture frame securing it in place. I also nailed the material to the center of the front of the frame tacking it down in the right place.
- Accessories: I found a lot of food and dishes (including super cute kitchen aid for kids) off of Craigslist for just $12. Buying used is definitely the way to go if you are on a budget!
Approximate project time: 35 hours.
|