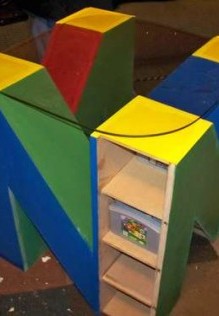
How and How Long:If you have ever used a Nintendo 64 you know the original Nintendo logo. My intent for this table is to have a glass top and to be used for holding games. The shelves are wide enough to hold Nintendo 64 games and nick-nacs but not wide enough to hold PS3 or Xbox360 game cases.
The doors are completely removable and held the in place by magnets.
- This project is relatively easy and could probably be completed in a weekend.
Almost everything I did was on the table saw.
Using your 1/2 MDF boards cut
(16x) 5.25'' wide 20'' long strips.
- Vertical Legs:
(8x) 5.75 wide 22+''long strips (for now it will be too long you will cut length in a moment).
- Diagonal Pieces:
Take these pieces and cut 53 degree angle on one side.
Once you are further into the project you will shorten the length and add 53 degree angle cut to the end.
Using your 1/4 MDF board cut
(4x) 4.75 wide 22+'' long strips (for now it will be too long you will cut length in a moment).
- Tops for Diagonal Pieces:
(Depends on how many shelves you want) 4.75'' by 4.75'' squares (shelves and supports for Diagonal pieces)
Each leg is made of 4 long strips and 5 squares.
Each Diagonal Pieces has two sides and a top. You can add a bottom I didn't because it so low to the ground and I added a secret compartment in mine.
- Corner Posts: Prep Work
Clean off an area that can be left undisturbed for a couple of hours.
Lay down newspaper because this next step could get messy.
Each leg is made of 4 long strips and 5 squares.
In order to make the leg I glued three of 5.75''by 20'' strips together and put a shelve piece every 4''.
Add glue to all touching edges.
Use claps to hold the box together.
Prefer to use at least 3 one at each end and one in the middle.
DO NOT over tighten clamps or you could have bowing.
CHECK that all edges are flush or nearly flush with each side.
DO NOT glue down a fourth long piece if you want it to be removeable.
- Removable Doors: I wanted these doors to be removable while also being strong enough to be held in place.
I did not want to use a hinge in this kind of wood because I felt it would be to flimsy.
I have a surplus of magnets, so I tried these and they worked perfectly.
In each door there are 6 sets of magnet pairs;
3 sets securing the door to the right and 3 sets securing the door to the front.
The magnet sets are placed ever 5'' in the vertical post.
I added the magnets by first drilling a hole slightly deeper than the height of the magnet and wider than diameter of the magnet.
- I filled the hole with glue, placed the magnet, pushed it down so it was flush with the board and wiped away the excess glue.
- Repeat
After you have completed the process with the door repeat the process with the box. The location of the magnets should line up when you place the door on the box.
- MAKE SURE that you put the magnet pairs opposite one another. If the magnet end sticking out the door is North, the magnet end sticking out of the box should be South. Otherwise it will never close.
- Sharp Edge: Diagonal Piece Construction.
Once the sides and top pieces are glued together you will notice an edge needs to be chamfered.
I tried to cut this on the table saw but this is 37 degree angle and the table saw has a range of 90 to 45 degrees.
Again this is new to me correct me if there is a better method.
I used a orbital sander and took this edge off ever diagonal piece. The board is only 1/4'' thick and it sands away very quickly.
- Glue and Construction: Now your ready to start putting it all together.
The approach that I found the easiest was to build two N's. Once each were dry I stood them up straight and added an diagonal piece between them.
Take this step slow and allow the pieces to dry thoroughly. You will only cause yourself trouble if you rush this step. You will have more gaps, sanding, and unlevel top if not dried correctly.
- Repairs (Maybe): Unless you're an excellent cut, you will have a few gaps in between your joints.
These joints will be highly unfashionable if unintended so we are going to take care of them now.
This was my first wood project so I was trying some different thing when filling in the gaps.
I tried mixing saw dust and wood glue spreading it into the cracks. This worked at first but after a while it got to be a little messy and hard to handle.
Wood filler was OK but expensive.
Eventually my dad suggested bondo from Auto Zone.
It is used for filling car damage and it goes on smooth and can be primed and painted.
For a couple of bucks it worked well.
It was going to be sanded down and painted so I wouldn't see it so I didn't mind using it.
- Tape, Paint, Repeat: Ok this step is going to be time a little time consuming as well.
Just take your time and walk away and allow the each coat to fully dry.
Clean off the table first. If you have one I used an air compressor and blew all the dust off the table.
First Prime the entire project with 3-4 coats of primer.
Tape off the area where you will be spraying the yellow.
You do not need to cover the whole project unless your a really bad aim or overly cautious.
I sprayed lightest to darkest so if I sprayed in places where I shouldn't it would soon be covered up.
Next spray on the yellow with enough layers where you are comfortable with the color. Numbers of layers depend on thickness of layers.
After an hour or two once the paint is safe to touch completely cover the yellow with masking tape and continue onto the next color, red.
- Continue this process until all colors are added.
Directions for using spray paint
Shake can 1-2 minutes and during use.
Test spray in an inconspicuous area for compatibility.
Hold can 6''-8'' from surface, spray in sweeping motion motion side to side with slightly overlap.
Apply multiple thin coats, wait 1 minute between each coat.
Dry in 10 minutes or less.
- Apply additional coats within 1 hour or after 24.
- Clean up: To prevent clotting hold can upside down outside and spray until clear (2-3 seconds).
Approximate project time: 5 hours.
|