How and How Long:
- When it comes to preserving book-pressed flowers, forget hairspray.
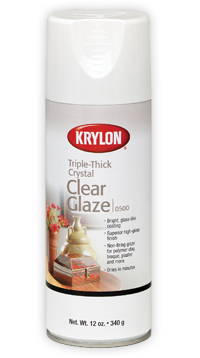
It doesn't get easier, better, or more permanent than good quality clear spray paint!
Krylon makes a Triple-Thick Clear Glaze that covers beautifully in a single coat.
- I always try to leave the stem on the flowers I dry because it makes them easier to handle. When that isn't possible, a toothpick can be attached to the dried flower with just a tiny dab of white glue if there's no stem.
A gentle burst of clear spray paint is all you need to preserve your pressed flowers.
They need to dry thoroughly after being coated with spray paint. I use bowls filled with sand to stand the stems/toothpicks in.
You can also use sand-in-a-fancy-dish to make a pretty flower centerpiece!
- Dried flowers and weeds: The fun really begins when you start transforming/preserving plain old weeds and give them color!
Collect every dried weed and flower that catches your fancy. Some are sturdy, some aren't. lol... JUST PLUCK!
I had no previous experience with preserving dandelions or their GIANT 5" cousins I encountered this year... I'm just sharing my trial and error technique.
When you're spray painting dandelion-type seed pods, remember they are fragile. Try to pluck them while their stem is still green. The spray paint will work like a fine mist of GLUE if you take it slow and easy.
- Hold the nozzle of the spray paint can at least 8-10 inches away from the target.
Point the nozzle directly toward the CENTER of the target.
Spray in short bursts. Gently rotate the target, spraying over the entire surface.
DON'T overdo the first coat.
- BE PATIENT and allow it to dry completely before you apply a second coat.
3-4 coats should keep the pods intact. Be sure to spray up the stem and onto the base where the seeds attach to the stem.
You can use ANY color spray paint. I used white, black, red, gold, silver, lavender, blue, pink and yellow spray paint.
White spray paint seemed to accentuate the natural, 3D honeycomb appearance more dramatically than black.
Yellow paint attracted tiny bugs like crazy!
Hummingbirds naturally gravitated toward the red.
As you play with the spray paint, you'll get more confident and start layering colors. It is so easy... and there are no mistakes.
HAVE FUN WITH THIS!
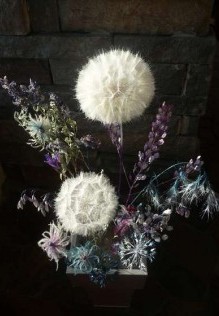
- So Pretty!
A few weeks ago I looked out my window at an unusually lush, green and colorful landscape and began gathering wildflowers to press.
Then Summer finally showed up and within a few days, that same landscape turned "tan". Along with the tan, Mother Nature also added dozens of HUGE dandelion-type seed pods and other strange, furry plant creatures I'd never-ever noticed before.
Maybe I just wasn't looking all these years? (well...I'm looking now!)
I just grabbed my shears and started clipping whatever looked interesting. The variety of "subjects" was immensely varied and the whole process became a little addictive! You'll have different indigenous weed and flower species to choose from anyway. No special skills or tools are needed.
Bouquets and Table centerpieces are just the beginning.
Approximate project time: 1 hour.
|