How and How Long:
- Disassembly: The first thing I did was disassemble this heater - down to every last panel and part. There was quite a bit of rust involved, so I wanted to get at every nook and cranny. As I took it apart, I photographed every part as I went so I would remember how it went back together.
It wasn't a difficult disassembly. Basically every part was held on by machine screws and nuts. The only hard part was figuring out the order to remove things.
- Sand and Primer: Wire brushing and sanding came next. I wire brushed the metal plate removed from the front and the legs and corner pieces.
All of the panels were sanded with 220 grit sandpaper, then 400 grit.
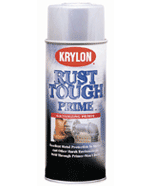
After wire brushing the trim and sanding the panels, I sprayed them with Krylon Rust Resistant primer.
While the primer was drying, I wire brushed every machine screw head and sprayed them with primer as well.
- Paint the housing: After the primer had cured, I applied the paint. I was initially going to paint each individual part, but decided to pre-assemble the main part of the stove before applying the paint. Some of the inside pieces were a bit of a challenge to get positioned, and I figured I would risk scratching the paint on the inside if I did that. So, I pre-assembled the interior parts of the stove, then painted it as a unit.
Next, I painted the top and front panel as separate pieces, and a shelf I had made to go into the bottom of the heater (in lieu of a curved diverter that had initially been there). This panel would allow plants or candles to be placed inside the bottom of the heater.
For all these parts I used Krylon hammered finish black paint.
- Paint the trim: For the trim pieces, I first sprayed them with Krylon gloss black paint. After this was dry, I lightly "dusted" them with bronze paint, so some of the black would show through.
I used the same process on the machine screws that held the trim parts onto the heater.
- Install the lower shelf: I made the shelf for the lower part of the heater out of plywood that I cut to fit the braces at the bottom of the heater. To install the shelf I merely set it on top of the braces.
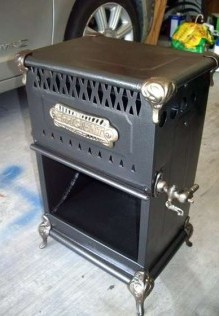
- Final assembly: Once all the paint was dry, reassembly took less than thirty minutes. I have posted a few before and after photos to show how far this old heater has come in its restoration.
Even though this heater will be used as a plant stand, no change was made to prevent it from being used as a heater should the need arise. All I would have to do is remove the bottom shelf and reinstall the curved panel that was in the bottom, and it would be a heater once again.
- Finished: This old heater should serve for at least another 90 or so years as a plant stand in our kitchen. Well, actually we won't last that long, but it can serve someone well!
This was not a difficult project, very messy & dirty at times, but not overly difficult.
I enjoy saving old rusty things from the scrap heap and making something useful out of them.
Approximate project time: 5 hours.
|