What you need:
- Fabric: I used a light blue broadcloth, but most fabrics would work. Smoother fabric is better, fabric that has any loose fibers or pilling will pick up spraypaint differently and those imperfections will be magnified. The paint stiffens the fabric, too, so take that into account. You'll need enough fabric to make whatever you're making plus a little more. A commercial pattern will give you a yardage, buy a bit extra for testing things on. Natural fibers are generally more receptive to paint than synthetics, and do a paint test before you do a lot of work.
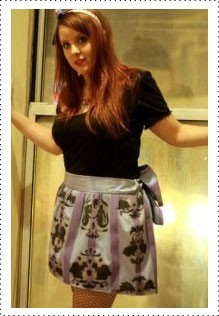
- A Pattern: Commercial patterns can be super, I made up my own but I've been sewing forever. Skirts are fairly simple so making up my own was easy. I'll talk about how I made my pattern in the next step, but definitely use an existing pattern if you're more comfortable with that.
- General Sewing Supplies and Notions: I'm not really teaching you how to sew here, there are a ton of very useful instructables on the basics of sewing. A commercial pattern will tell you what zippers/buttons/elastic/etc your pattern needs.
- An Iron: This is vital. Iron your fabric and iron it again. The smallest wrinkle will catch spraypaint unevenly, leaving you with fabric that looks permanently wrinkled.
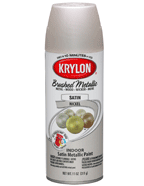
- Spray Paint: At least on fabric, the best coverage comes from flat paint, the worst from gloss. Pick the right colors for your look, but get flat if you can. Gloss will work, but your fabric is likely to end up stiffer than with a flat. I used a metallic silver, a purple and a black. It should be fairy obvious that color selection is completely up to you. Test your colors on scrap fabric before committing. They can look very different layered over other colors. One can of each color was enough, but you might need more if you go bigger.
- Cardstock: To cut into stencils. Heavier is better, but heavier is also harder to cut. If you plan to use your stencils a lot of times go heavy, if you're only using them a few times go with a lighter weight.
- Cutting Tools: Something sharp to cut your stencil with. An exacto knife, a utility knife, a disposable knife, whatever. Don't skimp on sharp blades. Sharp blades make better cuts and reduce your risk of injury.
- A Sheet of Cork: This is optional, but you may choose to pin your stencils down into cork to keep them in place better.
- A Dust Mask/Safety Glasses/Gloves/Air Purifier: Any time you're dealing with dust or solvents breathing protection is a good idea. If you're doing this casually a dust mask should be enough, if you're working with spraypaint a lot upgrade yourself to better breathing protection. Safety glasses will keep the paint out of your eyes. Rubber/plastic/nitrile/vinyl gloves will keep the paint off your hands. I'm an artist that works with art materials a lot and I didn't really believe in air purifiers until I bought one. I have a small desktop model (around $35 at a big box retailer) and I've been amazed at the improvement in air quality since I started using it. This is a great investment if you're going to do a lot of questionable things to your indoor air.
Newspaper - You'll be making a mess, protect your work surface or appreciate it's new painty facade.
- Waxed Paper: You'll use this between layers of fabric to keep your paint from bleeding through. Waxed paper peels of most painty things pretty well.
- A Fan: If you're impatient this will speed things along.
|
 |