How and How Long:
- Wipe down the bike with rags and then take it apart. Use the screwdrivers and wrenches to remove the wheels, seat, and kickstand. Also take off any accessories, including reflectors, water bottle holders, and bells. The WD-40 will help loosen screws and bolts. Finally, peel off the decals and stickers with a razor blade.
- Wear your respirator and very thoroughly sand every surface frame. Get the sandpaper into the nooks and crannies as much as you can. The success of your project largely dependse of the bik on the sanding. One hour of sanding is good, but two hours is even better. Wipe down the bike again to remove all the dust.
- Use the masking tape and plastic bags to cover any parts of the bike that you do not want painted. Wrap the bolts. Put the grips of the handles and the pedals into plastic bags and then tape them down. Tape about 1/2 of the chain and then fit the rest into a plastic bag and secure it closed.
- After all that hard work preparing the bike, it's finally time to add the amazing paint! Start with the X-Metals Converter. Shake the can very, very well. Rattle the spray paint for at least 2 minutes before you begin. These paints have so much metallic shine, and it is very important to make sure that they are well mixed.
- Hold the can about 1' from the surface, make sure the arrow on the nozzle is pointing away from you, and then press and hold the tip down. Spray the paint using smooth, swooping motions. Keep the can slowly moving to avoid drips. Instead of heavy coats, the best coverage comes from applying many thin coats. Allow the Converter base coat to dry for 30 minutes. Because of the unique properties of the paint, it is recommended that you apply the X-Metals colors within one hour of the Converter drying, or, after 5 days.
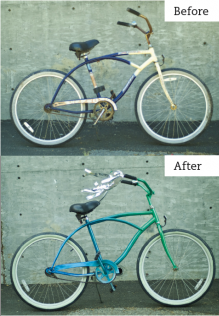
- Choose one end of the frame to begin painting with the X-Metals paint. Shake the can as in Step 6. The X-Metals is sheer and it can let light shine through and hit the Converter under-layer. To achieve the best look with this paint, the objective is to apply the thinnest amount of paint as possible. If you apply it too thickly, the look is less reflective. To create the fade, choose one color for the front of the bike, and one color for the end. To blend them in the center where they meet just switch back and forth between the colors adding little sprays here and there. Let the paint dry overnight.
Tip: The heavier metallic particles will settle to the bottom quickly. Shake the paint as much as you can while you work, giving it a good rattle every minute or two.
- If you want to add some glowing goodness to your ride, first remove and clean the tires. Tape off everything but the white walls and use the can of Krylon Glowz. If you do not have white walls, for the strongest luminescence, paint the tire white before you add the Glowz. Let the paint dry overnight.
- When the frame of the bike is dry, remove all of the painter's tape and plastic bags. Clean the chain by soaking it in the small container of oil and then wiping it down.
- To create the stremers, cut as many 4' lengths of Mylar ribbon as you like. Gather the stremers together and fold them in half. Twist 2' of wire around the Mylar, leaving the ends of the wire bent out. Push the wire "T" into the handlebars one end at a time.
Step 10: Reassemble the bike and then take a spin around your neighborhood galaxy!
Approximate project time: 4 hours.
|